
Article · Brandon Warrell
What is a dieline? Packaging templates explained with a class-project wrapper
A dieline is the flat template of a package. It shows where the package is cut, folded and glued, laid out as if you had opened the finished box or wrapper and pressed it flat. You set your artwork on it so each graphic lands on the right panel, then print and fold a test copy before anything goes to production.
What is a dieline?
It's a map of the package's structure, with every cut and fold shown flat. PakFactory calls it a design blueprint for the packaging's layout.
The dieline isn't part of the design. It guides the setup and doesn't appear on the finished package. Your artwork sits with it in the same file, so you can see exactly where a headline or barcode will fall once the package takes shape.
What do the lines on a dieline mean?
Most templates use some version of these:
| Line or area | What it marks |
|---|---|
| Cut line | Where the die cuts through the material, which sets the package's final shape |
| Fold or crease line | Where the material is scored and folded, not cut |
| Perforation line | Where the material is punched so it folds or tears more easily |
| Glue area or tab | The flaps where the package is bonded together |
| Bleed line | How far the artwork runs past the cut |
| Safe line | The area for important graphics and text |
There's no universal color code for these lines. PakFactory's guide shows cut lines as solid black and fold lines as solid red, while Diecuttemplates shows cut lines in red. So red can mean a fold on one template and a cut on another. Read the legend on your supplier's template, and don't assume a color means what it meant on your last job.
Glue areas vary too, so check the template for any that must stay unprinted.
Where do bleed and safe areas go on packaging?
Bleed goes outward, past the cut line. PakFactory gives a typical figure of 0.125 in (3 mm), but it isn't universal. Packlane asks for at least 0.125 in and 0.25 in on corrugated boxes, and Custom Box Makers asks for at least 0.25 in. Use your supplier's number, and run background art all the way into the bleed.
The safe area goes inward, away from the cuts and folds. Custom Box Makers asks for at least 0.125 in from any fold or cut line, and other suppliers set their own distance. Packaging has more edges to watch than a flat print job, because every fold line inside the layout needs the same care as the outer trim.
Why are some panels upside down in the flat file?
Because folding changes which way a panel faces. A panel that looks wrong on the flat sheet may be set that way so it reads correctly on the finished package.
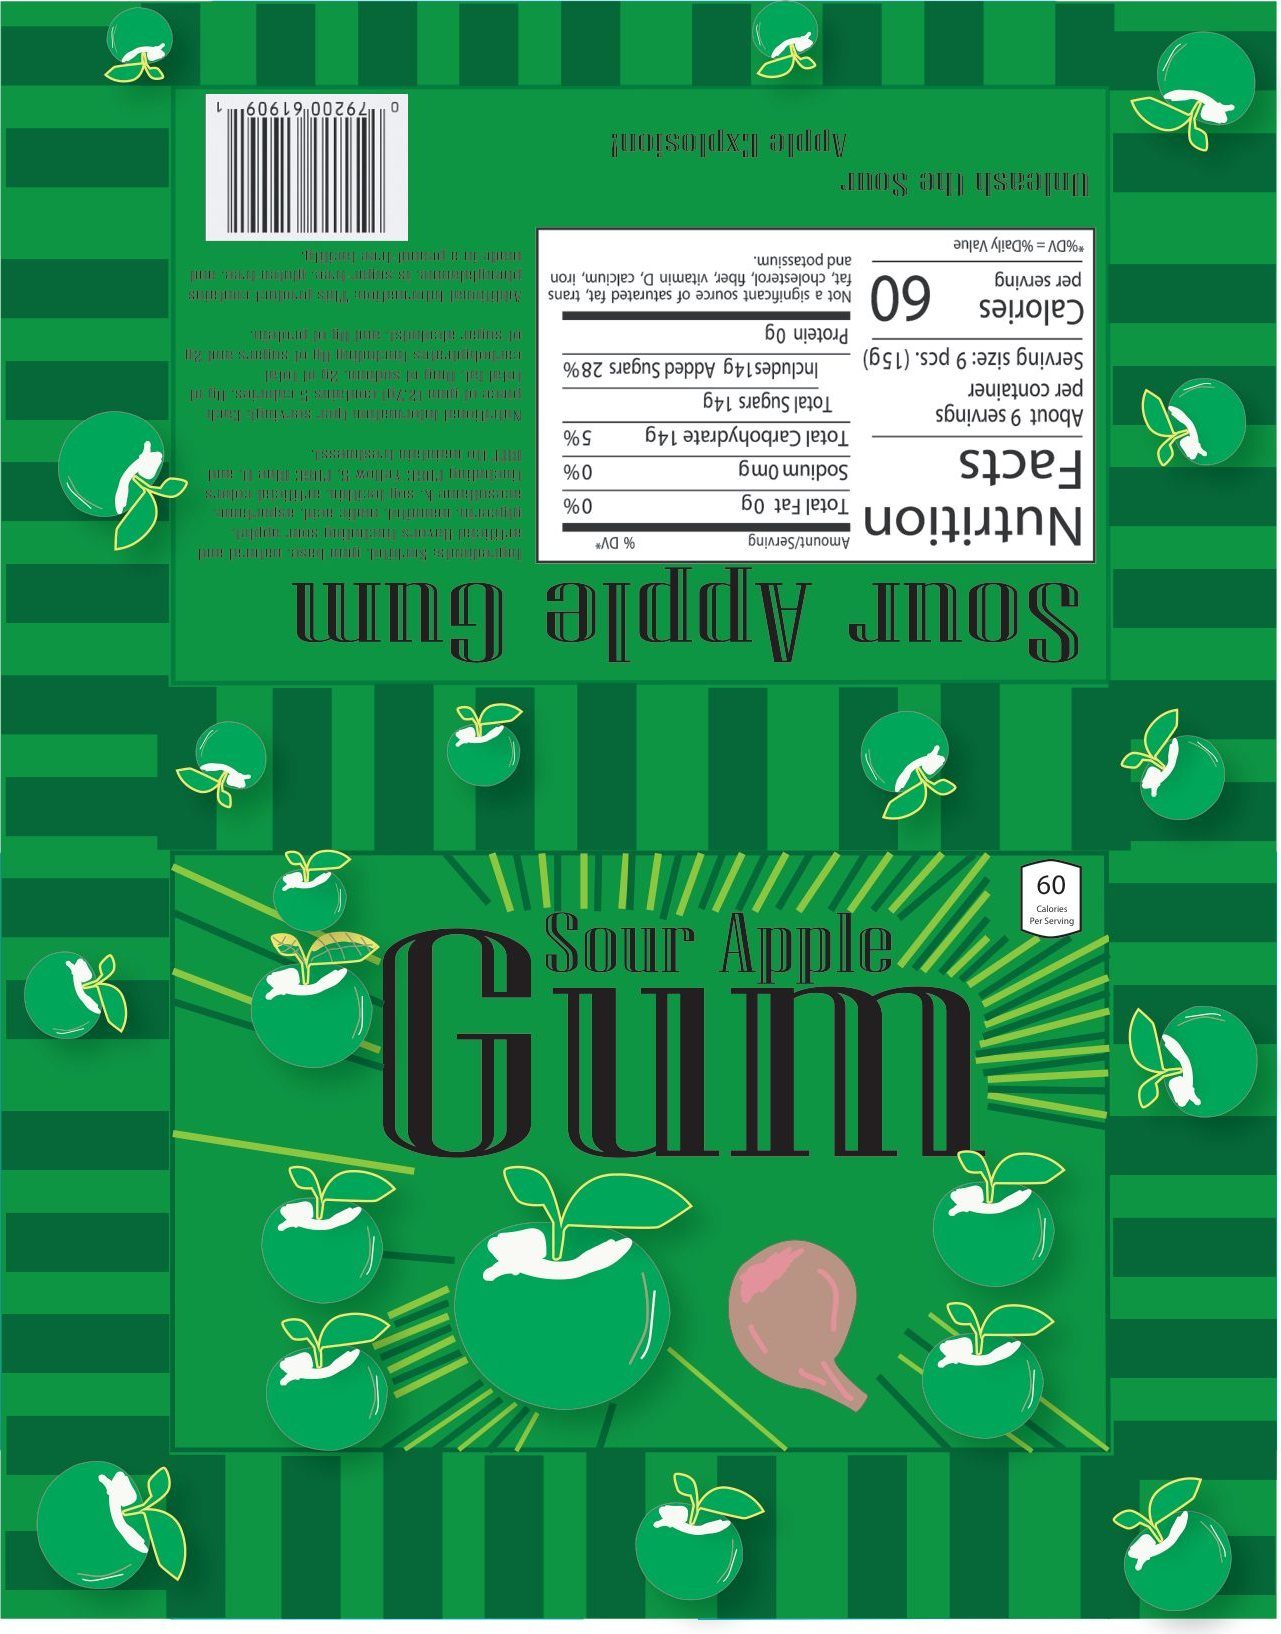
You can see this kind of layout in my Sour Apple Gum wrapper, a class project from Graphic Design Basics at State College of Florida (SCF), not a real product. The front panel sits right-side up. The full back panel, with its nutrition facts, serving information and barcode, sits upside down relative to the front. This image is the flat art only, with no cut, fold or glue lines showing, so it shows panel orientation only, not a dieline.
The amount of rotation depends on the structure. Packmojo's display box guide inverts the design on top of the lid because the lid folds in half, and its tray and sleeve guide rotates the sleeve top and bottom 90 degrees. Your supplier's guide decides, not a general rule.
How should the dieline sit in your artwork file?
Keep it on its own layer, separate from the artwork, in the same file. Most of the other details depend on the printer, and the instructions do differ:
- Name and color: SinaLite's roll label guide asks for a stroke in a spot color named exactly "Dieline", on a separate layer in the same file. That's one printer's setup for one product, and other printers use different names.
- Printing behavior: SinaLite's guide has you check overprint on the dieline stroke, and Custom Box Makers says the dieline itself won't print. Ask your printer whether to set overprint, mark the layer non-printing, or both.
- Keeping the layer: Custom Box Makers also says not to delete the dieline layer.
Before you export, follow your printer's written instructions for all three.
Where do you get the right dieline?
From the printer or supplier who will make the package. Their file reflects their structure, their legend and their bleed and safe figures. A template from another company may look close and still use different numbers.
If you're hiring a designer, send the dieline along with every line of text the package must carry. A long ingredient list can force a change to the layout, so have the text ready first. The design brief guide has the full list for packaging and labels.
How do you test a dieline with a paper mockup?
Print it, cut it and fold it. A flat file can't show you how the folds behave. I did the same kind of check with my class-project gum wrapper: I printed it, cut it out and folded it into a working prototype to check the panels and folds. The checklist below is general advice for your own test:
- Print at actual size. In Acrobat's print dialog, Actual size prints without scaling, while Fit resizes the page to the paper. Actual size crops anything that doesn't fit, so use larger paper or tile a large template across sheets.
- Cut and score before you fold. Scoring creases the sheet first so it folds cleanly. Without it, heavier stock can split at the fold.
- Check the panel order. Confirm each panel lands where you planned and reads right-side up. Packlane recommends printing and assembling a model for this reason.
- Look at the folds and seams. Type shouldn't wrap across them. GS1 UK says never to place barcodes, including their quiet zones, on folds, seams, flaps, perforations, die-cuts or edges.
- Read the small type in your hand. Hold the package at normal reading distance and read every line, especially ingredients and fine print.
- Fix the flat file. Make every change in the artwork file, not on the paper copy, then print and fold it again.
You can also ask the company making the package for a white dummy, an unprinted sample of the structure, instead of cutting one by hand.
What should you send the packaging printer?
Ask first, because requirements vary. These examples come from printers' own guides:
- The artwork on their template, with the dieline layer intact. Custom Box Makers accepts Illustrator (.ai) files and layered, editable PDFs compatible with Illustrator.
- Separate, labeled files for inside and outside designs, if the package prints on both. Packlane gives "Box_Exterior" and "Box_Interior" as examples.
- Color and type settings. PakFactory asks for fonts converted to outlines, CMYK files, and 100% K for black text, QR codes and UPC barcodes.
- Notes on special finishes, if the job has any. Custom Box Makers asks for these with the files.
If you'd like a designer to handle it, my packaging design page shows the class-project wrapper. Packaging or label design starts at $200, and the FAQ covers pricing and what you get back, including a print-ready PDF in CMYK with bleed, set up to your printer's specs.